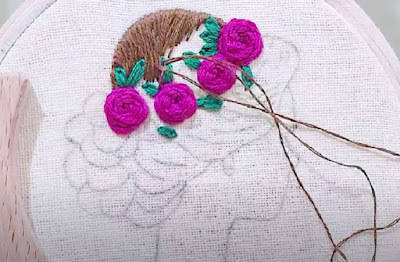
Super Creative Embroidery Girl Hair Embroidery Tutorial: Step-by-Step Cute Vintage Bun Hairstyle
Embroidery is a timeless art form that has been cherished for centuries. It allows us to express our creativity and add a unique touch to various items, from clothing to home decor. In this tutorial, we will explore the fascinating world of hair embroidery, specifically focusing on creating a cute vintage bun hairstyle. With the help of exclusively designed Super Creative Embroidery patterns, this tutorial is perfect for beginners looking to enhance their embroidery skills. Let's dive into the step-by-step instructions and uncover the magic of combining hair and embroidery!
Materials Needed:
Embroidery hoop
Fabric (preferably cotton or linen)
Embroidery needles
Embroidery floss in various colors
Scissors
Pencil or water-soluble fabric marker
Vintage bun hairstyle embroidery pattern (available for free)
Step 1: Prepare Your Fabric
Start by selecting a suitable fabric for your embroidery project. Cotton or linen fabrics work well as they provide a stable surface to work on. Cut your fabric to fit within the embroidery hoop, leaving some extra space around the edges for framing later.
Step 2: Transfer the Embroidery Pattern
Print out or trace the Super Creative Embroidery girl hair embroidery pattern onto your fabric using a pencil or water-soluble fabric marker. Make sure to position the pattern in the desired location for the vintage bun hairstyle.
Step 3: Set Up Your Embroidery Hoop
Separate the embroidery hoop into two parts and place the smaller ring underneath your fabric. Lay the larger ring on top, aligning the screw mechanism. Gently tighten the screw to secure the fabric between the two hoops, ensuring it is taut.
Step 4: Begin the Embroidery
Thread your embroidery needle with a strand of embroidery floss in a color of your choice. Starting from the backside of the fabric, bring the needle up through the fabric, near the outline of the vintage bun hairstyle. Begin stitching along the pattern lines using a basic embroidery stitch such as the backstitch or split stitch.
Step 5: Fill in the Design
Once the outline is complete, select another color of embroidery floss to fill in the hair. You can choose different shades to add depth and dimension to the hairstyle. Experiment with long and short stitches or try the satin stitch for a smoother, solid fill.
Step 6: Add Details and Accents
To bring your vintage bun hairstyle to life, add additional details and accents using different embroidery techniques. Consider using French knots for texture, seed stitches for shading, or even beads and sequins for a touch of sparkle.
Step 7: Finishing Touches
Once you are satisfied with your embroidery, carefully remove the fabric from the hoop. Trim any excess fabric, leaving a small border around the design. If desired, you can frame your embroidery using a traditional hoop or create a unique display by mounting it on a canvas or wooden embroidery hoop.
Embroidery offers endless possibilities for creativity, and combining it with hair embroidery opens up a whole new world of artistic expression. By following this Super Creative Embroidery Girl Hair Embroidery Tutorial, you have learned how to create a cute vintage bun hairstyle using step-by-step instructions and exclusively designed embroidery patterns. Remember, this technique can be applied to various modern embroidery designs and hand embroidery art projects. So, let your imagination soar and create delightful embroidery art featuring girl portraits, bride embroidery hoops, birthday hoop art, and more. Get started on your own embroidery journey today and discover the joy of bringing beauty to life with a needle and thread!
Thanks for stopping by today!


Comments
Post a Comment