Quick and Easy DIY: Adorable Felt and Fabric Flower Girls
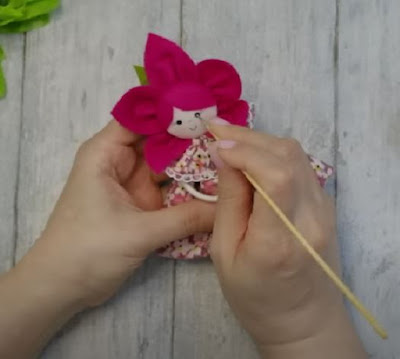
If you're looking for a fun and creative craft project, why not try making cute little flower girls out of felt and fabric? These delightful creations are perfect for adding a touch of charm to your home decor, gifting to loved ones, or even as party favors. The best part is, they are quick and easy to make! In this blog post, we will guide you through the step-by-step process of crafting these adorable flower girls. Let's get started!
Materials Needed:
Felt for the "body" (thick) The length depends on the thickness of the felt
Felt for a flower (thin, soft!)
Cotton fabric
Fabric jersey
Button
Rope, cord
Lace
Acrylic paints
Ribbon, flower
Cotton stuffing
Step 1: Creating the Base
To start, cut out a rectangular piece of thick felt, approximately 6 inches long and 3 inches wide. This will serve as the body of your flower girl. You can adjust the size according to your preference.
Step 2: Designing the Dress
Choose a piece of cotton fabric and cut it into a rectangular shape, slightly larger than the felt body. Place the felt on the fabric and fold the fabric over the felt, leaving a portion at the top for the head. Glue or sew the fabric together, ensuring a snug fit around the felt body.
Step 3: Adding the Head
Cut a small circle of thin, soft felt for the flower girl's head. Use acrylic paints to add facial features such as eyes, nose, and mouth. Let it dry completely. Once dry, attach the head to the top of the felt body using glue or sewing.
Step 4: Creating the Hair
Take a piece of fabric jersey in your desired color and cut it into thin strips. Attach the fabric strips to the top of the head, allowing them to cascade down as the flower girl's hair. You can also add additional embellishments like ribbons or flowers to enhance the hairstyle.
Step 5: Adding Details
Now it's time to bring your flower girl to life! Attach lace around the bottom of the dress to create a charming ruffled effect. Embellish the dress further by sewing or gluing buttons, beads, or other decorative elements of your choice.
Step 6: Finishing Touches
To give your flower girl a three-dimensional look, stuff the felt body with cotton stuffing. Be sure to fill it enough to create a plump shape but still maintain a soft and cuddly feel.
Step 7: Display and Enjoy!
Once you are satisfied with your creation, find a special place to display your adorable felt and fabric flower girl. Whether it's on a shelf, a mantel, or even as a centerpiece, these charming little figures are sure to brighten up any space.
Creating cute little flower girls out of felt and fabric is a delightful and rewarding craft project. With just a few materials and simple steps, you can bring these charming characters to life in no time. Let your imagination run wild with different colors, patterns, and embellishments to personalize each flower girl. Get started on this quick and easy DIY project today and enjoy the joy these delightful creations bring to your surroundings!


Comments
Post a Comment