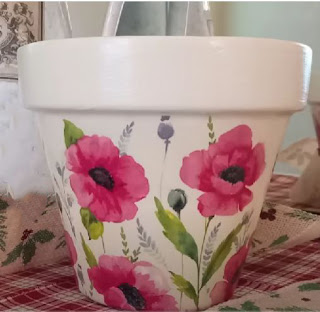
Transforming an Ordinary Terra Cotta Pot: Easy Decoupage Technique with Napkins
Looking for a creative way to breathe new life into an ordinary terra cotta pot? Decoupage is a fantastic technique that allows you to transform simple objects into stunning works of art.
In this tutorial, we'll guide you through an easy decoupage technique using napkins and glue. Whether you're looking to create a personalized gift or add a touch of beauty to your own space, this project is perfect for both beginners and experienced crafters. So, let's get started!
Materials Needed: To complete this project, you will need the following materials:
Cream or white acrylic paint or chalk paint
A contrasting paint color
Decoupage glue
Paper napkins
Water and a fine-tipped brush
A paintbrush
Water-based varnish
Cling film
Nail file
Step 1: Prepare the Terra Cotta Pot Start by cleaning the terra cotta pot to ensure a smooth surface for painting. Remove any dirt or debris and allow it to dry completely before moving on to the next step.
Step 2: Paint the Base Coat Apply a base coat of cream or white acrylic paint or chalk paint to the entire surface of the pot. This will create a neutral background for the decoupage design. Allow the paint to dry thoroughly.
Step 3: Choose Your Napkin Design Select a paper napkin with a design that you find visually appealing. Napkins with intricate patterns or floral motifs work particularly well for this project. Carefully separate the layers of the napkin, as you will only be using the top, printed layer.
Step 4: Cut and Prepare the Napkin Cut out the desired design from the napkin, making sure to remove any excess white borders. To achieve a smooth finish, tear the edges of the design instead of cutting them with scissors. This will help the napkin blend seamlessly onto the pot.
Step 5: Apply Decoupage Glue Using a paintbrush, apply a thin layer of decoupage glue to the area of the pot where you want to place the napkin design. Ensure that the glue is evenly spread and covers the entire surface.
Step 6: Apply the Napkin Gently place the napkin design onto the glued surface of the pot. Starting from the center, carefully press down the napkin, smoothing out any wrinkles or air bubbles. Work your way towards the edges, adhering the napkin to the pot.
Step 7: Seal the Design Once the napkin is securely in place, apply another layer of decoupage glue over the entire design. This will seal the napkin and protect it from damage. Allow the glue to dry completely.
Step 8: Add Finishing Touches To add visual interest and depth to your design, use a contrasting paint color to highlight certain areas or add decorative accents. This step is optional but can elevate the overall look of the pot.
Step 9: Protect and Enhance To protect the decoupage design and give it a glossy finish, apply a coat of water-based varnish using a paintbrush. This will not only preserve the artwork but also enhance its vibrancy.
Step 10: Final Touches To create a smooth and polished surface, lightly buff the dried varnish with a nail file. This will remove any imperfections and give your terra cotta pot a professional finish.
Transforming an ordinary terra cotta pot into a beautiful piece of art is easier than you might think. By using the decoupage technique with napkins and glue, you can personalize a gift or bring a unique touch to your own living space. With just a few materials and simple steps, you can create a stunning masterpiece that showcases your creativity. So, gather your supplies and let your imagination run wild as you embark on this delightful crafting adventure!
Thanks for stopping by today!


Comments
Post a Comment