How to Transfer Images on Polymer Clay: A Photo Transfer Video Tutorial
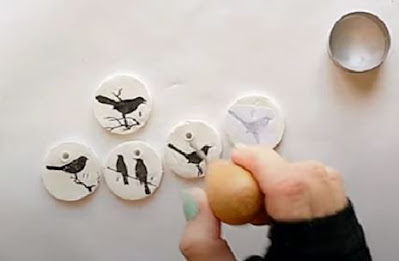
In this step-by-step tutorial, we will explore how you can easily transfer your favorite images onto polymer clay, creating beautiful and meaningful pieces that can serve as fantastic gifts or cherished keepsakes.
Materials Needed:
Polymer clay (choose colors that complement your image)
A smooth work surface
Rolling pin or clay roller
Printer or photocopier
Clear acrylic medium or gel transfer medium
Soft brush
Water
Paper towel
Baking sheet or tile
Oven or toaster oven
Varnish (optional)
Step 1: Choose and Prepare Your Image
Select a high-resolution photograph or image that you would like to transfer onto your polymer clay. It could be a picture of a loved one, a beautiful landscape, or anything else that holds personal significance. Resize and adjust the image as needed, ensuring it fits the dimensions of your desired clay piece.
Select a high-resolution photograph or image that you would like to transfer onto your polymer clay. It could be a picture of a loved one, a beautiful landscape, or anything else that holds personal significance. Resize and adjust the image as needed, ensuring it fits the dimensions of your desired clay piece.
Step 2: Print or Photocopy Your Image
Print or photocopy your chosen image onto regular printer paper. Remember to reverse the image horizontally if your design includes text or if you want the image to appear correctly after transferring.
Print or photocopy your chosen image onto regular printer paper. Remember to reverse the image horizontally if your design includes text or if you want the image to appear correctly after transferring.
Step 3: Prepare Your Polymer Clay
Condition the polymer clay by kneading it thoroughly until it becomes soft and pliable. Roll it out into a flat sheet using a rolling pin or clay roller. Ensure the clay is of uniform thickness, approximately 1/8 inch (3mm).
Condition the polymer clay by kneading it thoroughly until it becomes soft and pliable. Roll it out into a flat sheet using a rolling pin or clay roller. Ensure the clay is of uniform thickness, approximately 1/8 inch (3mm).
Step 4: Apply the Transfer Medium
Using a soft brush, apply a thin and even layer of clear acrylic medium or gel transfer medium onto the clay surface. Ensure the medium covers the entire area where you will be transferring the image.
Using a soft brush, apply a thin and even layer of clear acrylic medium or gel transfer medium onto the clay surface. Ensure the medium covers the entire area where you will be transferring the image.
Step 5: Apply the Image onto the Clay
Carefully place the printed or photocopied image onto the clay, with the ink side facing down onto the medium. Smooth out any air bubbles or wrinkles by gently pressing the image onto the clay, ensuring good contact.
Carefully place the printed or photocopied image onto the clay, with the ink side facing down onto the medium. Smooth out any air bubbles or wrinkles by gently pressing the image onto the clay, ensuring good contact.
Step 6: Remove Excess Moisture
Moisten a paper towel with water and gently rub the back of the paper, transferring the moisture onto the image. This will help release the ink from the paper and allow it to adhere to the clay. Be cautious not to oversaturate the paper or the image might smear.
Moisten a paper towel with water and gently rub the back of the paper, transferring the moisture onto the image. This will help release the ink from the paper and allow it to adhere to the clay. Be cautious not to oversaturate the paper or the image might smear.
Step 7: Remove the Paper
After a few minutes, start gently rubbing the paper in circular motions. The paper will begin to disintegrate and peel away, revealing the transferred image on the clay. Continue rubbing until all the paper remnants are removed, but be careful not to rub too hard and damage the image.
After a few minutes, start gently rubbing the paper in circular motions. The paper will begin to disintegrate and peel away, revealing the transferred image on the clay. Continue rubbing until all the paper remnants are removed, but be careful not to rub too hard and damage the image.
Step 8: Finishing Touches
Allow the clay to dry completely before proceeding. Once dry, you can refine the edges and shape of your piece, adding any additional details or textures. Follow the manufacturer's instructions to bake the clay in an oven or toaster oven to cure it.
Allow the clay to dry completely before proceeding. Once dry, you can refine the edges and shape of your piece, adding any additional details or textures. Follow the manufacturer's instructions to bake the clay in an oven or toaster oven to cure it.
Step 9: Optional: Apply Varnish
To enhance the durability and longevity of your transferred image, you can apply a layer of varnish once the clay has cooled down. This will protect the image and add a glossy or matte finish, depending on your preference.
To enhance the durability and longevity of your transferred image, you can apply a layer of varnish once the clay has cooled down. This will protect the image and add a glossy or matte finish, depending on your preference.
Transferring images onto polymer clay allows you to create unique and personalized pieces of art that hold sentimental value. With a few simple steps and readily available materials, you can turn your own photographs into stunning tiles, ornaments, pendants, and more. Whether you create these pieces for yourself or give them as gifts, the process is easy and rewarding. Unleash your creativity, and enjoy the beauty of combining photography and polymer clay to make one-of-a-kind treasures.
Thanks for Stopping by today!


Comments
Post a Comment