Easy Decoupage Napkin Transfer Technique for Polymer Clay: Unleash Your Creativity!
Are you looking for a fun and creative way to add beautiful patterns and designs to your polymer clay jewelry or clothing for figurines? Look no further!
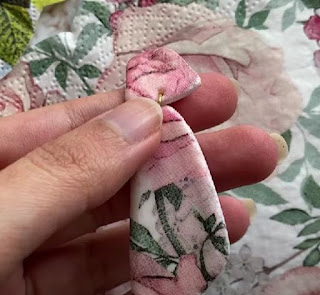
In this blog post, we will explore an easy decoupage napkin transfer technique that allows you to transfer patterns from paper napkins onto your earrings, pendants, or even fabric clothes for your polymer clay figures. This technique opens up a world of endless possibilities for creating unique and personalized pieces. So let's dive in and discover how this simple yet effective process can elevate your polymer clay creations!
Step 1: Gather Your Materials
To get started with this decoupage napkin transfer technique, you will need a few basic materials.
To get started with this decoupage napkin transfer technique, you will need a few basic materials.
These include:
Polymer clay: Choose a brand and color that complements your desired design.
Paper napkins: Opt for napkins with intricate patterns or designs that you would like to transfer.
Mod Podge or any water-based sealer: This will serve as the adhesive to transfer the design.
Small paintbrush: Use a soft brush with fine bristles to ensure precise application.
Jewelry findings: Earring hooks, pendant bails, or any other findings you wish to use.
Fabric (optional): If you want to create clothes for your polymer clay figures, you'll need a fabric piece.
Step 2: Prepare the Polymer Clay Base
Roll out your polymer clay to your desired thickness. Depending on your project, you can create earrings, pendants, or any other shape you prefer. Ensure that the clay surface is clean and smooth before moving on to the next step.
Roll out your polymer clay to your desired thickness. Depending on your project, you can create earrings, pendants, or any other shape you prefer. Ensure that the clay surface is clean and smooth before moving on to the next step.
Step 3: Separate the Napkin Layers
Most napkins are comprised of multiple layers. Carefully peel off the printed layer with the design you wish to transfer. Discard the remaining layers, as you will only need the topmost one.
Most napkins are comprised of multiple layers. Carefully peel off the printed layer with the design you wish to transfer. Discard the remaining layers, as you will only need the topmost one.
Step 4: Apply Mod Podge to the Polymer Clay
Using your small paintbrush, apply a thin and even layer of Mod Podge onto the area of the polymer clay where you want to transfer the design. Take care to cover the entire surface with the adhesive, ensuring it is smooth and free from clumps.
Using your small paintbrush, apply a thin and even layer of Mod Podge onto the area of the polymer clay where you want to transfer the design. Take care to cover the entire surface with the adhesive, ensuring it is smooth and free from clumps.
Step 5: Transfer the Napkin Design
Gently place the napkin over the Mod Podge-covered area of the polymer clay. Pat it down gently to ensure it adheres evenly. Smooth out any wrinkles or air bubbles with your fingers or a clean, dry cloth. Be gentle to avoid tearing the delicate napkin.
Gently place the napkin over the Mod Podge-covered area of the polymer clay. Pat it down gently to ensure it adheres evenly. Smooth out any wrinkles or air bubbles with your fingers or a clean, dry cloth. Be gentle to avoid tearing the delicate napkin.
Step 6: Seal and Protect the Design
Once the napkin is in place, apply another thin layer of Mod Podge over the top of the napkin design. This will act as a sealant, protecting the design from damage and ensuring its longevity. Allow it to dry completely according to the Mod Podge instructions.
Once the napkin is in place, apply another thin layer of Mod Podge over the top of the napkin design. This will act as a sealant, protecting the design from damage and ensuring its longevity. Allow it to dry completely according to the Mod Podge instructions.
Step 7: Finishing Touches
After the Mod Podge has dried, you can proceed with adding any additional embellishments or details to your polymer clay piece. This may include painting, adding rhinestones, or applying a clear coat of varnish for added shine and protection.
After the Mod Podge has dried, you can proceed with adding any additional embellishments or details to your polymer clay piece. This may include painting, adding rhinestones, or applying a clear coat of varnish for added shine and protection.
The decoupage napkin transfer technique is a simple and enjoyable way to add intricate patterns and designs to your polymer clay jewelry or clothing for your figurines. With just a few materials and easy-to-follow steps, you can unlock endless creative possibilities and create unique, personalized pieces.
So, why not give this technique a try? Watch the video tutorial mentioned above for a visual guide, and let your imagination run wild with this versatile technique! Happy crafting!
Thanks for Stopping by today!


Comments
Post a Comment