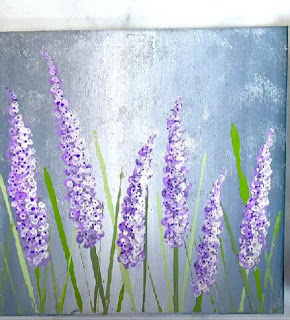
How To Paint Lavender Flowers with Q-Tips! | Beginner Acrylic Painting Step by Step Tutorial
Are you a beginner artist looking to explore your creativity and learn how to paint beautiful flowers? Lavender flowers are a popular choice due to their simplicity and elegance. In this step-by-step tutorial, we will guide you through the process of painting easy lavender flowers using acrylic paints. Even if you're just starting out, you can create stunning artwork by using some basic household items like Q-tips (cotton swabs), a wooden skewer, salt, and paper towel. Let's dive in and unlock your inner artist!
Materials Needed:
Acrylic paints (purple, green, white)
Canvas or canvas board
Paintbrushes (flat and round)
Palette or disposable plate
Water cup
Paper towel
Q-tips (cotton swabs)
Wooden skewer
Salt
Step 1: Prepare your workspace
Set up your workspace with all the necessary materials. Make sure you have a clean, flat surface to work on. Protect your workspace with a plastic covering or old newspapers to prevent any accidental spills or stains.
Step 2: Create the textured abstract background
To add a fun and textured element to your painting, start by painting the background using an abstract technique. Take a flat brush and apply random strokes of different shades of purple, green, and white on your canvas. Allow the colors to blend naturally. This will create a vibrant and lively backdrop for your lavender flowers.
Step 3: Add salt for texture
While the paint is still wet, sprinkle a small amount of salt on the canvas. The salt will absorb the moisture and create interesting texture and patterns. Let the salt sit for a few minutes until the paint is completely dry. Once dry, gently brush off the salt crystals using a clean, dry brush.
Step 4: Sketch the lavender flowers
Using a pencil or a thin brush, lightly sketch the outline of your lavender flowers. Lavender flowers have long, slender stems with clusters of small, delicate flowers at the top. Aim for loose, organic shapes rather than precise details.
Step 5: Paint the lavender flowers
Dip a Q-tip in purple paint and gently dot it along the top of the flower clusters. The Q-tip creates a soft, textured effect that mimics the appearance of lavender petals. Vary the pressure and angle of the Q-tip to create depth and dimension in your flowers. Remember, lavender flowers are typically light purple, so avoid applying too much paint.
Step 6: Define the flower stems
Using a wooden skewer or a thin brush, paint the slender stems of the lavender flowers in shades of green. Start from the bottom of the flowers and lightly drag the brush or skewer down to create a tapered effect. Keep the stems thin and delicate, adding a few branches here and there for a natural look.
Step 7: Highlight and blend
To add highlights and make your lavender flowers pop, dip the corner of a clean Q-tip into white paint. Gently dab the Q-tip on the center of the flower clusters to create highlights and enhance the three-dimensional effect. Blend the white paint slightly with the purple to create a seamless transition.
Step 8: Finishing touches
Allow the painting to dry completely before adding any final details. If desired, you can use a round brush to add small green leaves around the lavender flowers for added realism.
Once satisfied with your artwork, sign your name in the corner, and you're done!
Congratulations on completing your beautiful lavender flower painting! By following this beginner-friendly tutorial, you've learned how to create stunning artwork using Q-tips and basic household items. The textured abstract background, created with salt, adds an interesting visual element to your artwork.
Remember, practice makes perfect, so don't be afraid to experiment with different techniques and colors. Keep exploring your artistic journey and let your creativity blossom!


Comments
Post a Comment