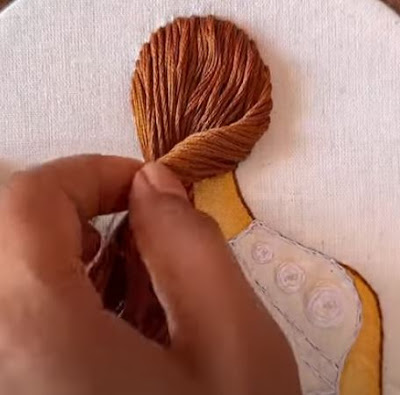
A Beautiful Fusion: Girl and Hair Embroidery Tutorial
Embroidery is a timeless art form that allows creators to weave intricate designs into fabric, turning everyday items into works of art. One particularly captivating style is hair embroidery, where delicate strands are stitched onto fabric to create lifelike portraits. In this tutorial, we'll explore the enchanting world of girl and hair embroidery, guiding you through the steps to create your own stunning masterpiece.
Materials Needed:
1. Embroidery hoop
2. Fabric (preferably a light-colored cotton or linen)
3. Embroidery needles (thin and sharp)
4. Embroidery floss in various colors (for the girl's features, hair, and background)
5. Scissors
6. Transfer pen or pencil
7. Reference image of a girl's portrait
Step 1: Prepare Your Workspace
Set up your embroidery hoop with the fabric stretched taut. Ensure good lighting and a comfortable seating position to prevent eye strain and backache during long stitching sessions.
Step 2: Choose and Transfer Your Design
Select a reference image of a girl's portrait. You can find free templates online or use a photograph. Resize the image to fit your fabric and print it out. Place the fabric over the printed image and trace the outline of the girl's face, features, and hair using a transfer pen or pencil. This will serve as your stitching guide.
Step 3: Start with the Face
Thread your embroidery needle with a flesh-colored floss. Begin stitching the girl's face using small, straight stitches for the outline and satin stitches for larger areas like the cheeks and forehead. Pay attention to the details such as eyebrows, eyes, nose, and lips, using different colors for each feature to add depth and realism.
Step 4: Embroider the Hair
The hair is the focal point of this embroidery. Choose a rich, contrasting color for the hair. Starting from the top of the head, stitch individual strands using a technique called "long and short stitch." This method involves blending long and short stitches to create a natural flow and texture. Vary the direction and length of your stitches to mimic the movement of real hair, focusing on highlights and shadows to add dimension.
Step 5: Add Background Details
Once the girl's portrait is complete, it's time to enhance the background. You can create a simple backdrop using basic stitches like running stitch or experiment with more complex patterns like French knots or seed stitches. Consider adding elements like flowers, leaves, or abstract shapes to complement the girl's portrait and create a cohesive composition.
Step 6: Finishing Touches
Once you're satisfied with your embroidery, remove the fabric from the hoop and trim any excess threads. If desired, you can frame your artwork for display or incorporate it into a larger textile project such as a pillow cover or wall hanging.
Tips for Success:
- Practice patience and attention to detail, especially when working on intricate areas like the eyes and hair.
- Experiment with different thread colors and textures to achieve the desired look for your embroidery.
- Don't be afraid to make mistakes; they can often lead to creative solutions and unique effects.
- Take breaks to rest your eyes and hands, especially during long stitching sessions.
Embroidery is a relaxing and rewarding hobby that allows you to unleash your creativity and create personalized pieces of art. By following this girl and hair embroidery tutorial, you'll develop valuable stitching skills while producing a stunning masterpiece that showcases the beauty of this timeless craft. Enjoy the journey of bringing your imagination to life, one stitch at a time.


Comments
Post a Comment